How to Repair a Burn Hole in a Car Seat

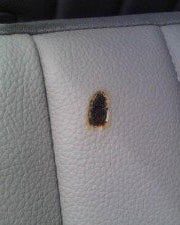
Accidents happen, and sometimes that means ending up with a burn hole in your car seat. Whether it was caused by a cigarette, a hot beverage, or some other mishap, you don’t have to live with an unsightly burn hole in your vehicle’s upholstery. Luckily, repairing a burn hole in a car seat is a relatively simple process that you can do yourself with a few basic tools and materials.
Before you get started, it’s important to gather the necessary supplies. You’ll need a leather repair kit or a fabric repair kit, depending on the material of your car seat. These kits typically include a color-matched repair compound, a texture pad, and sometimes a heat transfer tool. You may also need some additional materials like sandpaper, tweezers, and a clean cloth.
Once you have everything you need, it’s time to begin the repair process. The first step is to clean the area around the burn hole with a mild soap and water solution. This will remove any dirt or debris that could interfere with the repair. After cleaning, allow the area to dry completely before moving on to the next step.
How to Fix a Burn Hole in Your Car Seat
If you have a burn hole in your car seat, it can be an eyesore and can also decrease the value of your vehicle. Fortunately, repairing a burn hole in your car seat is a relatively simple process that you can do yourself with a few basic tools. Just follow these easy steps to restore your car seat’s appearance.
Materials You Will Need:
- Iron-on fabric patch
- Scissors
- Iron
- Heat-resistant fabric adhesive
- Clean cloth
Steps to Fix a Burn Hole in Your Car Seat:
- Clean the area around the burn hole with a clean cloth to remove any dirt or debris.
- Cut a piece of the iron-on fabric patch slightly larger than the burn hole.
- Place the patch over the burn hole, ensuring that it covers the entire damaged area.
- Set your iron to the appropriate temperature for the fabric of your car seat.
- Iron the patch onto the car seat, applying firm pressure and moving the iron in a circular motion for about 30 seconds. Be careful not to touch the iron directly to the patch, as it could melt or damage the fabric.
- Allow the patch to cool completely before proceeding to the next step.
- Apply a small amount of heat-resistant fabric adhesive to the edges of the patch, ensuring that it is completely sealed and will not come loose.
- Use your finger or a clean cloth to smooth out the edges of the patch and remove any excess adhesive.
- Allow the adhesive to dry according to the manufacturer’s instructions.
- Once the adhesive is dry, gently clean the repaired area with a damp cloth to remove any residue.
By following these steps, you can easily fix a burn hole in your car seat and restore its appearance. Remember to always read and follow the instructions provided with the products you use and to take appropriate safety precautions.
Important Safety Tips:
| 1. | Ensure proper ventilation when using fabric adhesive. |
| 2. | Always follow the manufacturer’s instructions for any products you use. |
| 3. | Use caution when working with an iron to avoid burns or other injuries. |
Assess the Damage
Before you begin repairing a burn hole in your car seat, it’s important to assess the extent of the damage. Start by examining the size and location of the burn hole. Is it small and localized, or is it a larger hole that has spread? The size and severity of the burn hole will determine the repair method you choose.
Next, determine the type of material your car seat is made of. Different materials require different repair techniques. Common car seat materials include leather, vinyl, fabric, or a combination of these. Knowing the type of material will help you select the appropriate repair tools and products.
Inspect the Surrounding Area
In addition to assessing the burn hole itself, take a closer look at the surrounding area of the car seat. Are there any signs of discoloration or charring? If so, it’s important to address these issues as well to ensure a seamless repair. Additionally, check for any loose threads or frayed edges around the burn hole. These may need to be trimmed or repaired to prevent further damage.
Determine the Cause of the Burn Hole
Understanding how the burn hole occurred can also be helpful in the repair process. Did the burn hole happen due to a cigarette, a hot object, or a chemical spill? This information can guide you in choosing the most appropriate repair method and products.
Remember: By thoroughly assessing the damage and understanding the specific materials and causes involved, you can make the best decisions when it comes to repairing the burn hole in your car seat.
Gather the Necessary Materials
Before you begin repairing the burn hole in your car seat, it’s important to gather all the necessary materials. Having everything ready will make the repair process much smoother and more efficient. Here’s a list of the materials you’ll need:
| 1. | A vinyl or fabric repair kit |
| 2. | A pair of scissors |
| 3. | A small paintbrush |
| 4. | An iron |
| 5. | A clean cloth |
| 6. | A vinyl or fabric patch |
| 7. | A hot glue gun |
| 8. | A razor blade or utility knife |
| 9. | A small piece of sandpaper |
| 10. | A heat gun or hairdryer |
Make sure to have all these materials in place before starting the repair process. This way, you won’t have to stop halfway through to gather something you missed. With everything ready, you’ll be able to seamlessly fix the burn hole in your car seat and have it looking good as new.
Clean the Area Around the Burn Hole
Before you can begin repairing the burn hole in your car seat, it’s important to clean the area thoroughly. This will ensure that the repair materials adhere properly and will give you a smooth and seamless finish.
Step 1: Vacuum the Area
Start by vacuuming the area around the burn hole to remove any loose debris or dirt. Use a soft brush attachment to gently clean the surface without causing any damage to the upholstery.
Step 2: Use a Mild Cleaner
Once you’ve removed the loose debris, use a mild cleaner and a clean cloth to gently wipe the area. Avoid using harsh chemicals or abrasive cleaners, as they can damage the upholstery. Instead, opt for a cleaner specifically designed for car interiors.
| Recommended Cleaners | |
|---|---|
| 1. Meguiar’s Carpet & Upholstery Cleaner | 2. Chemical Guys Fabric Clean Carpet and Upholstery Shampoo |
| 3. Armor All Oxi Magic Carpet & Upholstery Cleaner | 4. Turtle Wax Power Out! Upholstery Cleaner |
Gently dab the cleaner onto the cloth and wipe the area in a circular motion. Be careful not to saturate the upholstery with excess cleaner, as this can prolong the drying time.
Once you’ve cleaned the area, allow it to dry completely before moving on to the next steps of repairing the burn hole in your car seat.
Prepare the Repair Patch
Before you can begin repairing the burn hole in your car seat, it’s important to prepare the repair patch. This patch will be used to cover the damaged area and restore the upholstery to its original condition. Here are the steps you need to follow to prepare the repair patch:
Step 1: Gather the Materials
Start by gathering all the materials you will need for the repair. This includes a piece of fabric that matches the color and texture of your car seat upholstery, fabric glue, scissors, and a marker or chalk.
Step 2: Cut out the Patch
Using the marker or chalk, trace the outline of the burn hole onto the fabric patch. Make sure to leave a small margin around the edges to allow for any adjustments that may be needed during the installation process. Use the scissors to carefully cut out the patch along the marked lines.
Pro Tip: It’s a good idea to cut the patch slightly larger than the burn hole to ensure complete coverage.
Step 3: Test the Fit
Before applying the fabric glue, test the fit of the patch by placing it over the burn hole. Make sure it covers the damaged area completely and aligns with the surrounding upholstery. If any adjustments are needed, carefully trim the patch until it fits perfectly.
Note: Take your time during this step to ensure a seamless repair.
Once you have prepared the repair patch, you are ready to move on to the next step in fixing the burn hole in your car seat.
Apply the Patch to the Burn Hole
Now that you have prepared the patch and the burn hole, it’s time to apply the patch. Take the patch and carefully place it over the burn hole, making sure it covers the entire damaged area.
Press down firmly on the patch, ensuring that it adheres well to the upholstery. Use your fingers or a small roller to smooth out any air bubbles or wrinkles, ensuring a seamless finish.
Once the patch is securely attached to the burn hole, give it a little wiggle to make sure it’s firmly in place.
Pro tip: If the patch doesn’t stick well or you’re concerned about its durability, you can apply a fabric adhesive or upholstery glue around the edges of the patch. This will provide extra reinforcement and help ensure that the patch stays in place for a longer period of time.
Remember, the patch may not be a perfect match in terms of color or texture, but it will help hide the burn hole and prevent further damage to your car seat.
Smooth and Blend the Patched Area
After the patch has been applied, it’s important to smooth and blend the patched area to ensure it matches the rest of the car seat upholstery. You can use a fine-grit sandpaper to gently sand down any rough edges or bumps. This will help to create a smoother surface that will be easier to work with.
Once the patch feels smooth to the touch, you can use a leather conditioner or upholstery cleaner to help blend the color of the patch with the surrounding area. Apply a small amount of the product to a clean cloth and gently rub it into the patched area. This will help to soften any visible lines or discoloration caused by the repair.
It’s important to be patient while blending the patched area, as it may take several applications of the conditioner or cleaner to achieve the desired result. Take your time and continue to blend until the patch seamlessly matches the rest of the car seat upholstery.
By taking these easy steps to smooth and blend the patched area, you can effectively fix a burn hole in your car seat and restore its appearance. Remember to always follow the manufacturer’s instructions when using any cleaning or conditioning products, and test them on a small, inconspicuous area before applying them to the patched area to ensure compatibility.
Let the Repair Dry and Set
After applying the adhesive and patch, it’s important to let the repair dry and set properly. This will ensure that the patch adheres firmly to the car seat upholstery and doesn’t come off easily.
Depending on the adhesive you used, the drying and setting time may vary. It’s best to refer to the instructions provided by the adhesive manufacturer for specific guidelines.
During the drying and setting process, it’s important to avoid putting any weight or pressure on the repaired area. This can disrupt the adhesive bond and cause the patch to come loose.
While waiting for the repair to dry, it’s also a good idea to keep the car seat away from direct sunlight and extreme temperatures. Excessive heat or cold can affect the drying process and the overall durability of the repair.
It’s recommended to let the repair dry overnight or for at least 24 hours. This will ensure that the adhesive has enough time to fully set and bond the patch to the car seat upholstery.
Once the repair is completely dry and set, you can gently touch the patched area to check its firmness. If it feels secure and doesn’t move or come off easily, you can proceed to use the car seat normally.
However, if you notice any signs of the patch coming loose or the repair not holding up, it’s best to reapply the adhesive and patch following the same steps again.
Remember, patience and proper drying time are key to achieving a successful and long-lasting repair for the burn hole in your car seat upholstery.
Protect and Maintain the Repaired Area
Once you have successfully repaired the burn hole in your car seat, it is important to take steps to protect and maintain the repaired area. This will help ensure that the repair lasts and the upholstery remains in good condition for as long as possible.
1. Avoid exposing the repaired area to excessive heat
One of the main causes of burn holes is hot objects coming into contact with the upholstery. To prevent further damage, avoid placing hot items such as cigarettes, lighters, or heated objects near the repaired area. This will help maintain the integrity of the repair.
2. Clean and condition the repaired area regularly
Regularly cleaning the repaired area will help to remove any dirt or debris that could potentially damage the upholstery. Use a mild cleaning solution and a soft cloth to gently clean the area. After cleaning, apply a leather or fabric conditioner to keep the upholstery supple and prevent it from drying out and cracking.
By following these simple steps, you can protect and maintain the repaired area on your car seat. Taking care of your vehicle’s upholstery will not only keep it looking great, but also extend its lifespan.
Question-Answer:, How to fix burn hole in car seat
Can I fix a burn hole in my car seat myself?
Yes, you can fix a burn hole in your car seat yourself. With the right materials and a little bit of patience, you can easily repair your vehicle’s upholstery.
What materials do I need to fix a burn hole in my car seat?
To fix a burn hole in your car seat, you will need a repair kit specifically made for upholstery, a pair of scissors, a clean cloth, and a heat source such as an iron or a heat gun.
How much does it cost to fix a burn hole in a car seat?
The cost of fixing a burn hole in a car seat can vary depending on the size of the hole and the materials you need. On average, a repair kit can cost anywhere from $10 to $50.
Are there any professional services that can fix burn holes in car seats?
Yes, there are professional upholstery repair services that specialize in fixing burn holes in car seats. However, these services can be more expensive compared to doing the repair yourself.
Is it possible to camouflage the repaired burn hole on a car seat?
Yes, it is possible to camouflage the repaired burn hole on a car seat. Some repair kits include color-matching materials that can help blend the repaired area with the rest of the upholstery.
What are the common causes of burn holes in car seats?
There are several common causes of burn holes in car seats. Some of the most common causes include cigarette burns, hot ashes or embers from smoking materials, sparks from fire or fireworks, and accidental burns from hot objects or liquids.
Can I repair a burn hole in my car seat by myself?
Yes, you can repair a burn hole in your car seat by yourself. It is a relatively simple process that can be done using a few basic materials and tools. With the right instructions and some patience, you can easily fix the burn hole and make your car seat look as good as new.


